Stock Options: Selecting a Stock for Soups, Sauces, and Simmering

Leave a comment

Screen Shot 2015-01-07 at 7.08.31 AM

Stock Options:   Selecting a Stock for Soups, Sauces, and Simmering

by Martha Esersky Lorden

The traditional cure-all for whatever ails a body is a bowl of chicken soup. How it acquired such status as a great folk remedy is anyone’s guess.

The effectiveness of this magical broth in un-stuffing noses has been the subject of great study, and the results are in. According to Dr. Stephen Rennard of the University of Nebraska Medical Center (http://fyinutrition.com/mystery-chicken-noodle-soup), chicken soup’s high levels of zinc and cysteine have anti-inflammatory properties that help reduce phlegm. Its disinfecting, soothing heat can alleviate cold symptoms and speed recovery, and versions including garlic and onion pack a powerful antioxidant-al punch. Who knew that there really is such a thing as Jewish Penicillin?

Folks looking to create a made-from-scratch soup stock might turn to Gramma’s recipe of old, but home cooks should not discount utilizing the quality stocks available commercially, which also contain (and may even surpass) the healing potential of the favorite family super soup. The grocery shelves are brimming with options. Where to begin? There are cans, bottles, boxes, and jars—  some labeled as stock, others as broth. There are granulated powders, concentrates, and bullion cubes; low fat, low sodium, MSG free; organic, stock made from free-range chickens, stock with wine and seasonings, gluten-free… it boggles the mind. The makers of stocks and broths are obviously keeping up with the latest  food trends— even for something as basic as soup stock.

food-whybroth1

The creation of a good stock, according to chef Jacob Brun (Stella Culinary School), is the foundation of all great cuisines. Its role in the kitchen is profound. The art of making a stock lies behind any chef’s mastery of the mother sauces of classical cuisine as they are precise reductions of a quality stock.

But what exactly is a stock? And how does it differ from a broth? Many cooks look to richness or thickness as a point of differentiation, with stocks requiring simmering roasted bones to produce a flavorful gelatin. Some identify simmering fresh meat as what renders the lighter broth. Then there are debates about the levels or salt and seasonings. Like much terminology, colloquial usage can confuse the culinary definition. It’s a tedious affair trying to get to the bottom of these differences because, in truth, the differences are not easily standardized.

A quick look in the dictionary of the culinary world, Barron’s Food Lover’s Companion, and we find that broth is defined as a liquid resulting from cooking vegetables, meat or fish in water. The term is sometimes used synonymously with bouillon. On the other hand, a stock (from an old German word meaning  “root”) is simply a strained broth. In other words, a stock is just a broth until it is strained.  As a mere physical, not culinary, refinement of a broth, stock is associated with professional kitchens and serves as as a base for sauce-making or for simmering other ingredients.

When my favorite Food Network cooking diva sings the praises of keeping copious amounts of fabulous stock in the freezer for braises, gravies, and soups, I scoff.  Sure, I envy the luxury she enjoys every time she pops the lid of one of her quarts of stock kept on hand for cooking up comforting soups or braised shanks, but I know that her home made liquid gold takes pounds of ingredients and hours of simmering, usually in pots the size of the Grand Canyon. Or does it?

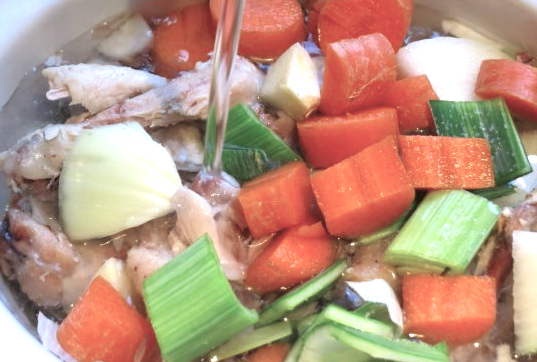
In just a basic home stockpot, cooks can pull off a restaurant grade stock.The basic building blocks are the classical triad of bones, some aromatics (like onions, carrots, celery, and parsley) and water. The formula seems simple enough, and what a great way to use up odds and ends of vegetables or those bone-in meat parts not usually served up as main dishes—  chicken necks, backs, and wings, or veal knuckle bones. How difficult can it be to roast the bones and vegetables, cover them in water, and simmer them with a sachet of seasonings (bay leaf, peppercorns, thyme, and garlic)?  A little cooling after a 3-4 hour simmer, some skimming of fat, and a thorough straining, and voilá— stock!

For the impatient and busy home cook, there are also excellent quick methods for making stock. I had my doubts, but I’ve finally come up with a recipe, inspired by Mark Bittman, that produces a flavorful, golden stock in just under an hour with some fresh chicken parts that you can get from your butcher. Part stock, part broth, this liquid cooking base can do anything that a stock-in-a-box can do. I love to cook rice in it or use it as a base for my pasta sauces. It also makes a terrific base for soups. You can also make any kind of stock at home in the reliable and convenient set-it-and-forget-it slow cooker.  (See recipes below.)

While many say that homemade stock is much better than anything you can buy in a can or carton, the tongue is the final judge. Yet, many home cooks opt for a commercial brand  that delivers a nice umami from its combination of sodium levels, additives, and meat /vegetable/seafood base. Some choose a prepared stock based on label information alone, not taste, and still other cooks select a variety simply because it has absolutely no additives whatsoever. Seeking to control the level of intensity or salinity in their dishes, many cooks enjoy using granulated bouillon, low salt/low fat stocks, or concentrates. When looking for a quality stand-in for homemade stock, you want a clean and savory flavor of meat, seafood, or vegetables, and you don’t want any lingering chemical tastes or anything overly salty.  And as for shelf life, prepared stock can’t be beat.

Be adventurous in your sampling, and you are certain to find that go-to stock for all your cooking. Though labeled “stock”, these prepared liquids are flavorful factory-made broths designed for the home cook. Unless you are preparing a demi-glace sauce for your master chef class, no worries. Your stock options are plentiful.

RECIPES

QUICK CHICKEN STOCK

(an interpretation of a Mark Bittman recipe from How to Cook Everything)

I use this recipe as the base for my Matzoh Ball soup and pasta sauces as well as for cooking rice and braising chicken.  It is surprisingly flavorful— and fast. You know its done when a golden color is achieved and a rich chicken flavor develops.   —Martha Lorden

Ingredients:

4 chicken wings with skin and meat removed

2 backs of a Chicken with skin removed

1/2 large onion, rough chopped (don’t peel it)

1 large carrot, rough chopped

1 stalk of celery, rough chopped

1 bay leaf

Directions:

1. Combine wings and backbone with onion, carrot, celery, and bay leaf in a large pot with 4 cups of water and turn heat to high.

2. Bring almost to boil, then lower the heat so the so the mixture bubbles very lightly. Cook for 30 minutes, or an hour if you have more time.

3. Cool slightly and strain. Press down the solids to extract as much liquid as possible and discard the solids.

Homemade Vegetable Stock (Slow Cooker Method)

(from Slow Cooker: The Best Cookbook Ever with More Than 400 Easy-to-Make Recipes by Diane Phillips)

Ingredients:

1/4 cup olive oil

4 carrots, cut into chunks

4 parsnips, cut into chunks

2 large onions, chopped

1 bunch (approximately 3 cups chopped) Swiss chard

8 oz slice mushroom

2 cups water

2 tbsp tomato paste

2 tsp dried thyme

1 bay leaf

2 tsp salt

1/2 tsp whole black peppercorns

Directions:

1. Put everything (and I mean everything!) into the insert of a 5 to 7 quart slow cooker and gently stir to combine. Cook on high for 5 hours or low for 9 hours.

2. Pour vegetable stock through a fine-meshed sieve set over a large bowl. If you desire, remove some of the larger chunks of vegetables first and discard them prior to pouring. Skim off any fat that accumulates.

3. In refrigerator, stock will keep for up to five days. In the freezer this will stay fresh up to 6 months.

Flora’s Fudge

18 Comments

Disney Characters in the Kitchen:  Revisiting A Childhood Recipe

The Fantasy Behind Flora’s Fudge:  Almost As Easy As Magic  (SEE FOLLOW UP NOTE AT BOTTOM OF THIS POST)

I have spent decades yearning for a slice of fudge.  Not just any fudge.  I’ve wanted a hunka hunka burnin’ chocolate nut fudge that I made as a child on a snowy afternoon with my father and sister.  But the recipe was parts unknown, and I only held a faded memory of the comical source of that wondrous fudge recipe.

It was 1959, and I was in a dream world having just seen Disney’s now classic animated film, Sleeping Beauty.  This obsession with medieval castles, a trio of fairy godmothers, and a prince of my own would eventually be eclipsed by a different Disney obsession with Peter Pan, the pirate-loving fella who could fly and preferred to hang out on an island with a team of really cool and furry friends. (I never understood that simpering Wendy.)

At about the same time that I was encountering these Disney role models, I became enamored with cooking with my father.  He loved to cook, and it was obvious in his joy over the stove when he boiled shrimp and stirred cocktail sauce to go with his highballs, much to my mother’s chagrin.  There were his amazing pancakes, eggs, bacon, and all manner of breakfast food.  “I could eat breakfast every meal,” he said.  And sometimes we did.  Having grown up in and around his parents’ bakery and then general store, Daddy was full of food stories about loading and butchering meat, stealing from the pickle barrel, and (my favorite) filling jelly donuts.

Sunday mornings we picked up the newspaper at the local journal joint on Pleasant Street.  The owner was a big cigar smoker and looked like a villain straight from Marvel comics, which he sold racks of.  I liked looking at the comic books (which oddly were displayed near all the dirty magazines). There, that Sunday, in the more PG of the spinning racks, I saw a shiny comic depicting Sleeping Beauty’s own private team of wish-grantors– those  pink, blue, and green Fairy Godmothers.  This comic book was our Sunday morning treat, and soon my sister and I lapped up all the silly adventures of the winged and glittering Flora, Fauna, and Merryweather.  But the added joy was on the back page of the issue where we discovered a recipe, written in a rebus code, called “Flora’s Fudge.”

4color984fairy-godmothers-f

That afternoon, we convinced our father to create what was sure to be a magical confection in our own kitchen. We decoded the recipe together and followed the directions. It was made in a saucepan, and the comic book image of the pot showed a small saucepan shaped like one we owned. For years, every time we made the fudge, about halfway through the recipe, we transferred the melted base into a mixing bowl to add all the confectioner’s sugar and chopped nuts. Within moments of adding the sugar, and nuts, the fudge became impossible to stir.

Of course, I believed, it never would have been a problem for Flora, the fairy godmother.  All she needed was a flick of her magic wand to transform the ingredients into fabulous fudge. Only our father’s brute force could maneuver the spatula enough to combine the ingredients, and I remember looking forward to and giggling at the funny faces he made in the effort. Our father was great in a pinch.

What follows is the exact recipe for Flora’s Fudge from the vintage comic.  After 50 years of wondering, and a few wild goose chases, I finally tracked down the very comic of my youth on e-Bay. I mistakenly had been hunting for the Sleeping Beauty comic and not The Fairy Godmothers issue. 

Even though I found a posting of the recipe itself on-line, it would not do. I had to have that illustrated rebus in my hands. I had to know if it was really as good and still as hard to stir as I remembered. My imagined solution, then, is to begin with a larger pot to accommodate all the powdered sugar, keep it on the burner at low, and see if this makes a difference in the effort required to combine all the ingredients;

Let’s test my hypothesis.  

4color984fairy-godmothers-b

The Process:

All ingredients assembled. Chocolate selected was 100% Cacao unsweetened chocolate bar by Hershey.

Then I thought that a deep, non-stick  soup pot was a sure bet for handling the large amount of sugar and would prevent any chance of burning. I actually had a roll of wax paper on hand– shades of the fifties when mom wrapped my sandwiches with it for school lunch.

Butter and chocolate melted nicely,  Some panic set in when adding the egg right into the pot– what if it scrambled?  Use a whisk and then spatula and take it off the heat for a moment when adding the egg. Then add vanilla. The liquids kept the mass moving easily.

Then it was time for half of the confectioner’s sugar–  things started to seize up and turn to oatmeal consistency.  A continuous mixing seemed to soften the combination, and it accepted the nuts easily.

Adding the second half of the sugar required patient stirring for it to combine , but the stirring was not sticky or stiff as I remember it.  Everything was sliding around the pan nicely…

So it was time to dump it into the glass dish and ready it for the fridge.

It had only a moderate sheen and did not stick to together the way I remembered it. It came out rather grainy.  Why…..?  In retrospect, I made errors:

1)  I am not sure I would use the same unsweetened chocolate I did.  It was Hersheys.  I chose it because it seemed like what we might have used then, but next time I will try Bakers Chocolate.  It just seemed to not have enough fat or cocoa butter in it.

2) I will not use a non-stick pan. I’m going for my mom’s old Revere Ware. The non-stick pot never seemed to heat up correctly on the sides, it was too wide, and it may have created sugar crystals. I beat the fudge before it cooled sufficiently which affected the crystals.

(So, what we did long ago with my father when we transferred the hot mess to a mixing bowl to add the sugar may have been the right step to take in retrospect.)

3)  I think that I stirred the butter too much. It should just melt into the chocolate on its own to avoid separating the water and fat in it.

The fudge tasted fabulous, but the mouth feel was definitely off.  Why don’t some of you give it a try out there?  OTK would love to know how fabulous was your version of Flora’s Fudge?

~~~~~~~~~~~~~~~~~~~~~~~~~~~~~

FOLLOW UP NOTE:

So 24 hours later, I can say that this first attempt at recreating Flora’s Fudge was a FLOP. But I have not given up and will revisit the recipe in the near future.

Readers out there who know about making candy or working with chocolate might offer up some good advice here. It would be appreciated.

And do let me know,  folks,  if you have tried it, too. The recipe is rather thin on directions, but then again, the comic artists at Disney in1959 were probably not chocolatiers– just Mousketeers.

MOUSEKETEERS6

Fast Flank Steak

Leave a comment

A recent trend in cookbooks is the quick-and-easy, fast-and-simple approach to cooking.  The thirty minute meal is nearly passé as some of the most glamorous chefs in the business are writing accessible, user-friendly, and super speedy recipe books for the home chef.  Popular now is a “1-2-3″ approach and poof!  You have a great meal on the table that is fine enough for entertaining.

So here is a fast and fabulous recipe that I put together in the spirit of “1-2-3″ for a great and versatile cut–  the flank steak.

I wanted to find a way to stop second guessing whether the steak was really done.  In  my early experiences with flank, I was destroying it by over cooking it into a tough, tasteless, and  gray chewfest.  This anxiety about killing the cut eventually led to undercooking it.  The outside looked perfect and the inside remained a very bloody, lukewarm mess. How to know?

The primary objective of the following recipe is not speed, though it does qualify as a 1-2-3 recipe.  I’ve just tweaked the name to 2-2-2 Marinated Flank Steak, and you’ll see why.  It’s easy to remember this recipe as it’s mostly about technique, not ingredients.

In fact, you might be surprised to find out how to get the perfectly seared and moistly cooked marinated flank steak every time.

 RECIPE FOR 2-2-2 MARINATED  FLANK  STEAK

Here’s the basic technique:

–2 hours of marination

–2 minutes in the microwave 

–2 minutes/side in a hot  frying pan

Now before you go all ballistic about the microwave part, keep reading.

MARINADE

Use your favorite marinade recipe.  It doesn’t matter!  Go Asian, Italian, Greek, or Mexican.  They all will work. (OK.  Even bottled will work, though it tends to be higher in sugar and salt, which means the flank might burn more easily at the high temps in the fry pan.)

For this posts’ version, I created my own recipe for an Asian marinade that is easy to remember because it also uses “2″ as its magic number. (See very bottom of this post.)  If you want easy marinade recipes for Greek or Italian, etc, contact me.

Also, you can post your own favorite marinade recipe below in the Replies.  Hungry people want to know!

(See recipe for this Asian marinade at the bottom of this post. Hmm.  Is that  mari-NAID, or mari-NAHHD?)

In a ziplock bag, pour in a generous cup of  your marinade.  Add the flank, squeeze out the air, and seal the bag.

You don’t need much.  You don’t want to drown the poor thing!

Massage the marinade into the meat and marinate for 2 hours, flipping and massaging again after one hour.

(Go do something else while it marinates.  You are not cooking yet. This is a great recipe for multi-tasking.)

HINT:  Since my flank steak was well-chilled when I put it in the bag, I did not refrigerate the bag for the two hours.  If you do, then your meat will not be approaching room temperature when you cook it.  That’s a problem, because the inside of the meat will be very difficult to heat during the cooking process.  The steak will be fine on your counter because it’s in a sealed bag in a slightly acidic concoction, so no need to put into fridge.  If you want to marinate it longer and do so in the fridge, just plan accordingly so that you can let the meat sit out a bit before cooking. It won’t take long at all because the cut is thin.

Next, remove the steak from the bag, and  reserve the marinade in the plastic bag.

Place meat on microwave safe dish and blast it for 2 minutes, uncovered.

Calm down… It won’t hurt the meat.

Avoid plastic wrap, please. If you cover the dish, the meat will steam and give up too much of its juice.

Then, coat a heavy bottomed pan with 2 TBSP of oil  (you chose which you prefer for searing in high heat. I like either olive oil or vegetable).

Crank up the heat, and when the oil starts to jump,add the meat.  There should be an audible hiss as the meat hits the hot pan.

Sear on each side for 2 minutes.

The meat will begin to shrink a bit, but good things are happening inside.

Remove the meat from pan and put it aside while you pour the remaining marinade from the bag, plus 2 TBSP of water, into the pan.

Lower the heat and let the sauce reduce for 2 minutes. If you wish, add more water.  It will tighten up quickly.

Return the meat to the pan and cook covered for…yup… 2 minutes (1 minute on each side).

Remove from heat, and let the steak rest for a good quarter of an hour or so.  Then slice the meat on an angle, cutting across the grain.

Juicy, tender, and very flavorful. Best served medium rare.  And wonderful in sandwiches, too.

 Got any ideas for sides?  Tell us what you think would help round out this main dish.

====================

Recipe for Asian marinade:  2 Tbsp of oil (sesame or olive of combo of both), 2 Tbsp of vinegar (white balsamic or white rice or combo of both), 2 Tbsp of paste made from Thai red curry and lemongrass paste, 2 Tbsp of chopped green onions, 2 cloves of garlic or more, and if you wish, 2 tsp of brown sugar, 2 Tbsp of soy (but salt to taste is better, because soy is sometimes a little funky in a marinade, but that’s my POV).  Stir well.